Follow Me On Social Media!
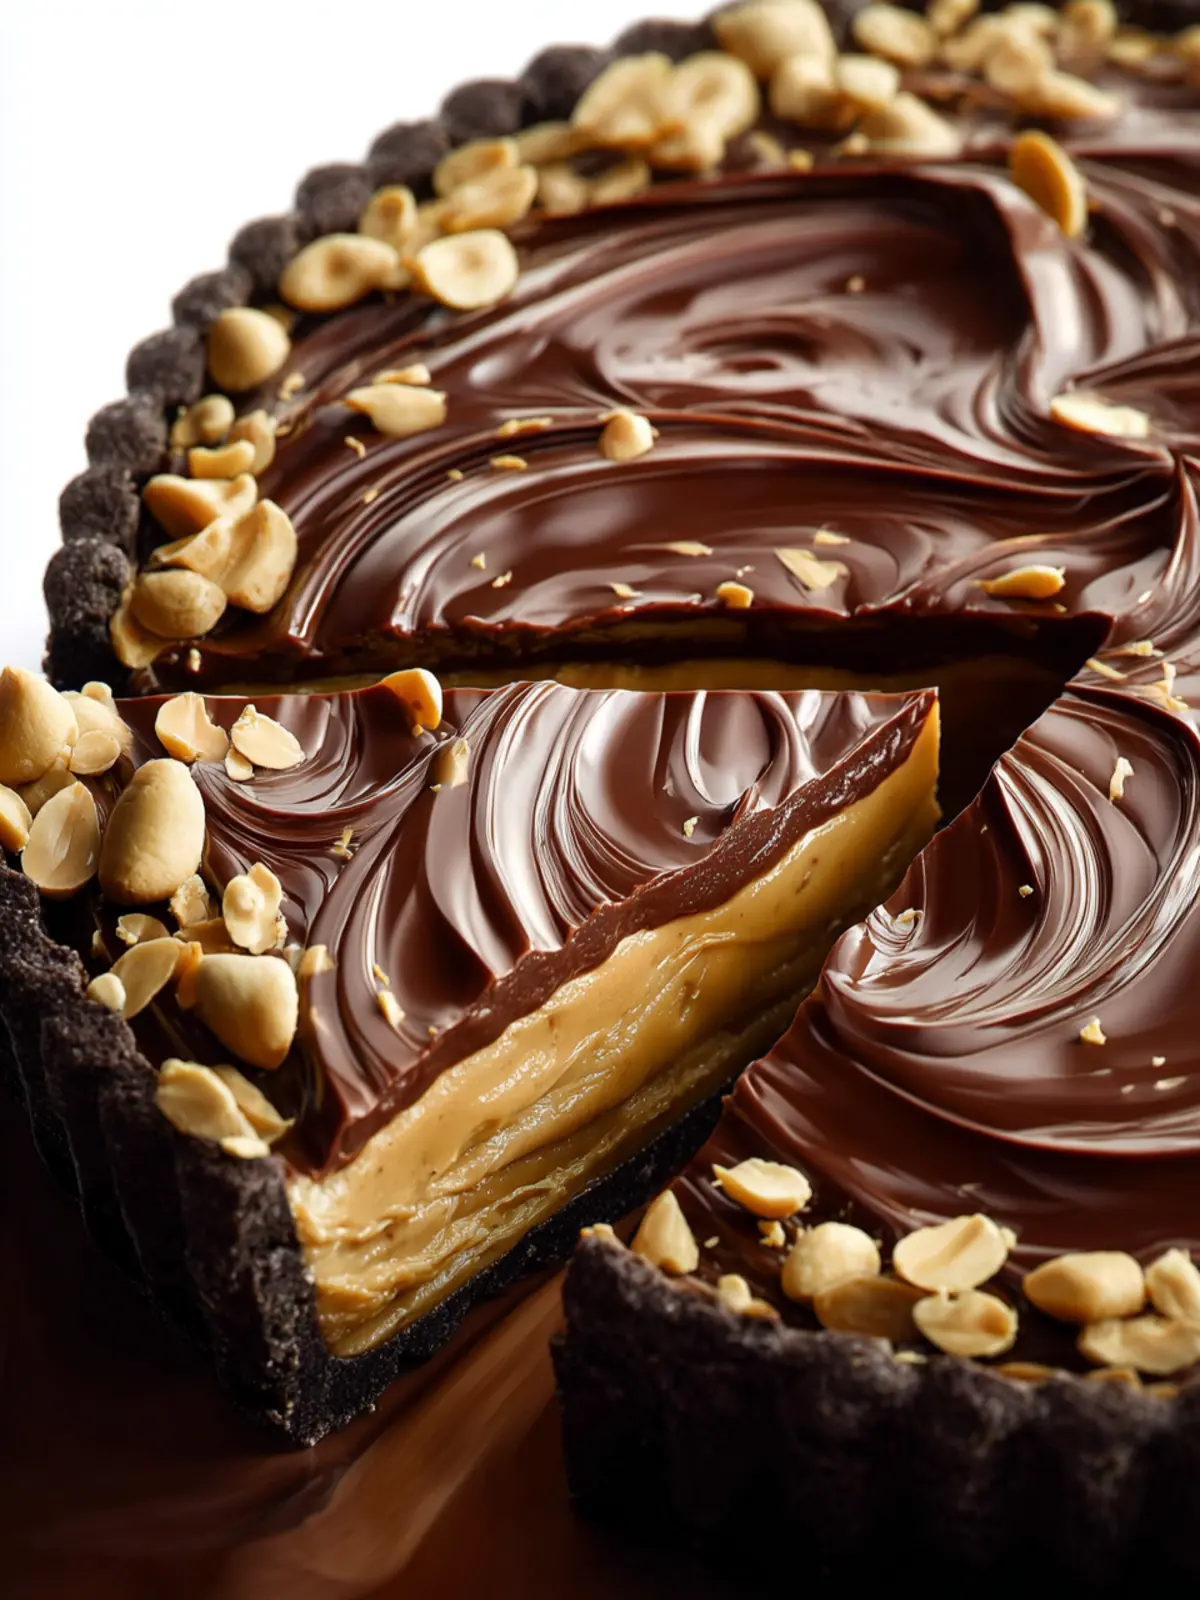
Chocolate Peanut Butter Tart: Irresistibly Creamy Delight
Introduction to Chocolate Peanut Butter Tart
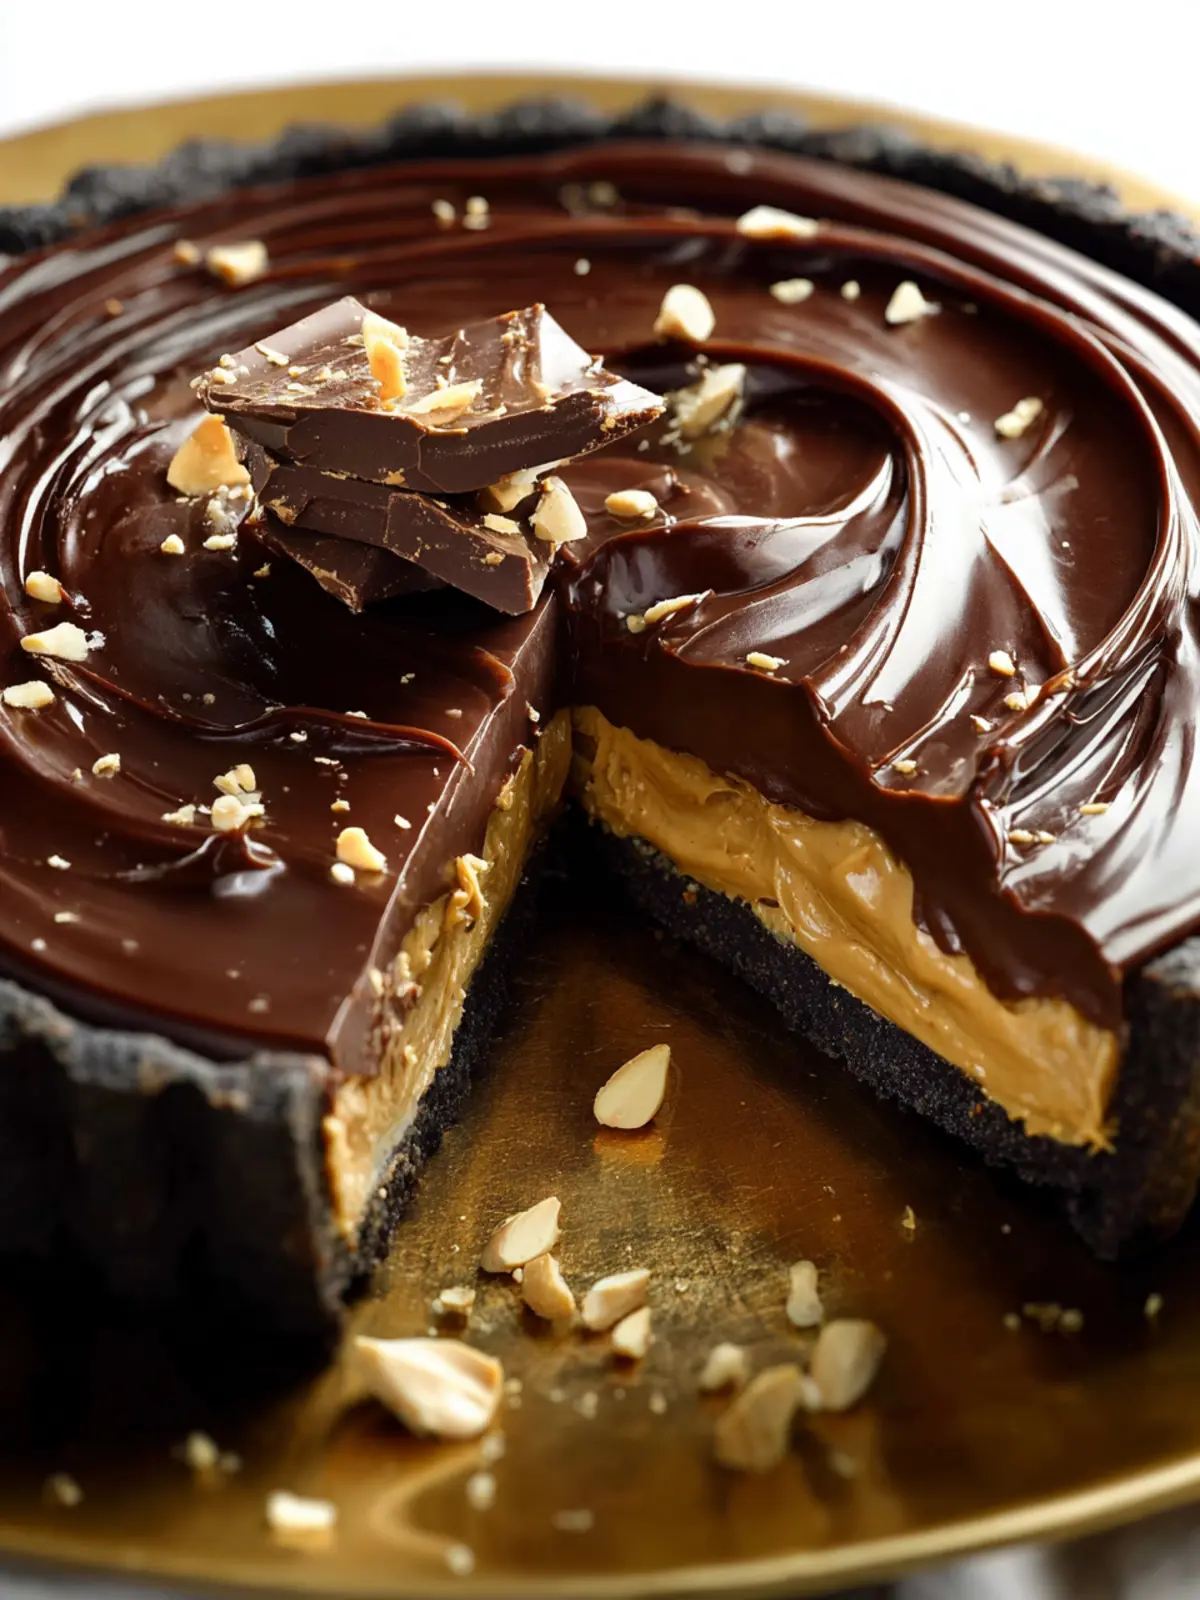
Imagine sinking your fork into a Chocolate Peanut Butter Tart, where rich chocolate and creamy peanut butter create a symphony of flavors that dances on your palate. This decadent dessert is not just a feast for the eyes; it’s an emotionally fulfilling treat that transports you back to the innocence of childhood, sweet memories of indulgence, and pure delight. Perfect for special occasions or a cozy night in, this tart stands out with its luscious texture, making it a must-try for anyone who has ever whispered sweet nothings to a plate of dessert.
What makes Chocolate Peanut Butter Tart a must-try?
The beauty of a chocolate peanut butter tart lies in its simplicity and the balance of flavors it offers. Here are a few reasons why you absolutely need to make this tart part of your dessert repertoire:
-
Unexpected Pleasures: The combination of peanut butter and chocolate is a classic for a reason. Those contrasting flavors are not just a delicious duo; they create a harmonious explosion of taste. The creamy, nutty essence of peanut butter perfectly complements the rich, velvety chocolate, adding depth to every bite.
-
Textural Bliss: This tart boasts a delightful contrast in textures. The crunchy crust, often made with crushed cookies or nuts, provides a sturdy base that sets the stage for the smooth and creamy filling. Each mouthful is a playful interaction between crunch and creaminess, keeping your taste buds engaged.
-
Quick and Easy: One of the best parts about making a chocolate peanut butter tart is how straightforward it is. With just a handful of ingredients, you can whip this dessert up in no time. It’s perfect for those spontaneous sweet cravings or last-minute gatherings.
-
Crowd-Pleaser: Whether you’re hosting a dinner party or just indulging on a weekend, this tart is guaranteed to impress. Its aesthetic appeal, combined with irresistible flavors, makes it a showstopper that will have everyone asking for seconds.
The chocolate peanut butter tart is more than just a dessert; it’s an experience that resonates with the joy of indulgence. Once you take a slice, you’ll understand why this tart deserves a special place in your recipe collection. Get ready to melt hearts and soothe cravings with this exquisite creation!
Key Ingredients for Chocolate Peanut Butter Tart
Rich Chocolate
For a truly indulgent chocolate peanut butter tart, high-quality dark chocolate is a must. The bittersweet richness of dark chocolate complements the creaminess of the peanut butter perfectly. I recommend using at least 60% cocoa for a deep flavor. If you prefer a sweeter tart, you could use semi-sweet chocolate instead, but don’t skimp on quality!
Cream
Heavy cream is the secret to achieving a smooth, luscious filling. It not only softens the chocolate but also creates a beautiful silky texture that melts in your mouth. Make sure to opt for heavy cream for the best result—it makes a world of difference when mixed with chocolate.
Peanut Butter
A creamy, natural peanut butter works wonders in this tart. Go for one with minimal ingredients—just peanuts and salt—for that authentic peanut flavor. This helps balance the sweetness of the chocolate beautifully.
Sugar
Granulated sugar is necessary to sweeten both the chocolate and the crust. For added depth, consider using brown sugar in your crust. It gives a subtle caramel flavor that complements the rich chocolate and peanut butter wonderfully.
Vanilla Extract
Don’t underestimate the power of vanilla extract! Just a splash adds warmth and depth to the filling, enhancing the overall flavor profile of your tart. Always choose pure vanilla extract for an authentic taste.
By using these key ingredients, you’ll create a chocolate peanut butter tart that is not only delicious but also impressively rich and satisfying!
Why You’ll Love This Recipe
When you take your first bite of this chocolate peanut butter tart, you’ll be transported to dessert heaven. The harmonious marriage of rich chocolate and creamy peanut butter creates a symphony of flavors that dance on your palate. This is not just any dessert; it’s a celebration of indulgence that brings comfort and joy, making it the perfect treat for a cozy night in or a gathering with friends.
Here’s why this chocolate peanut butter tart is destined to become your go-to dessert:
-
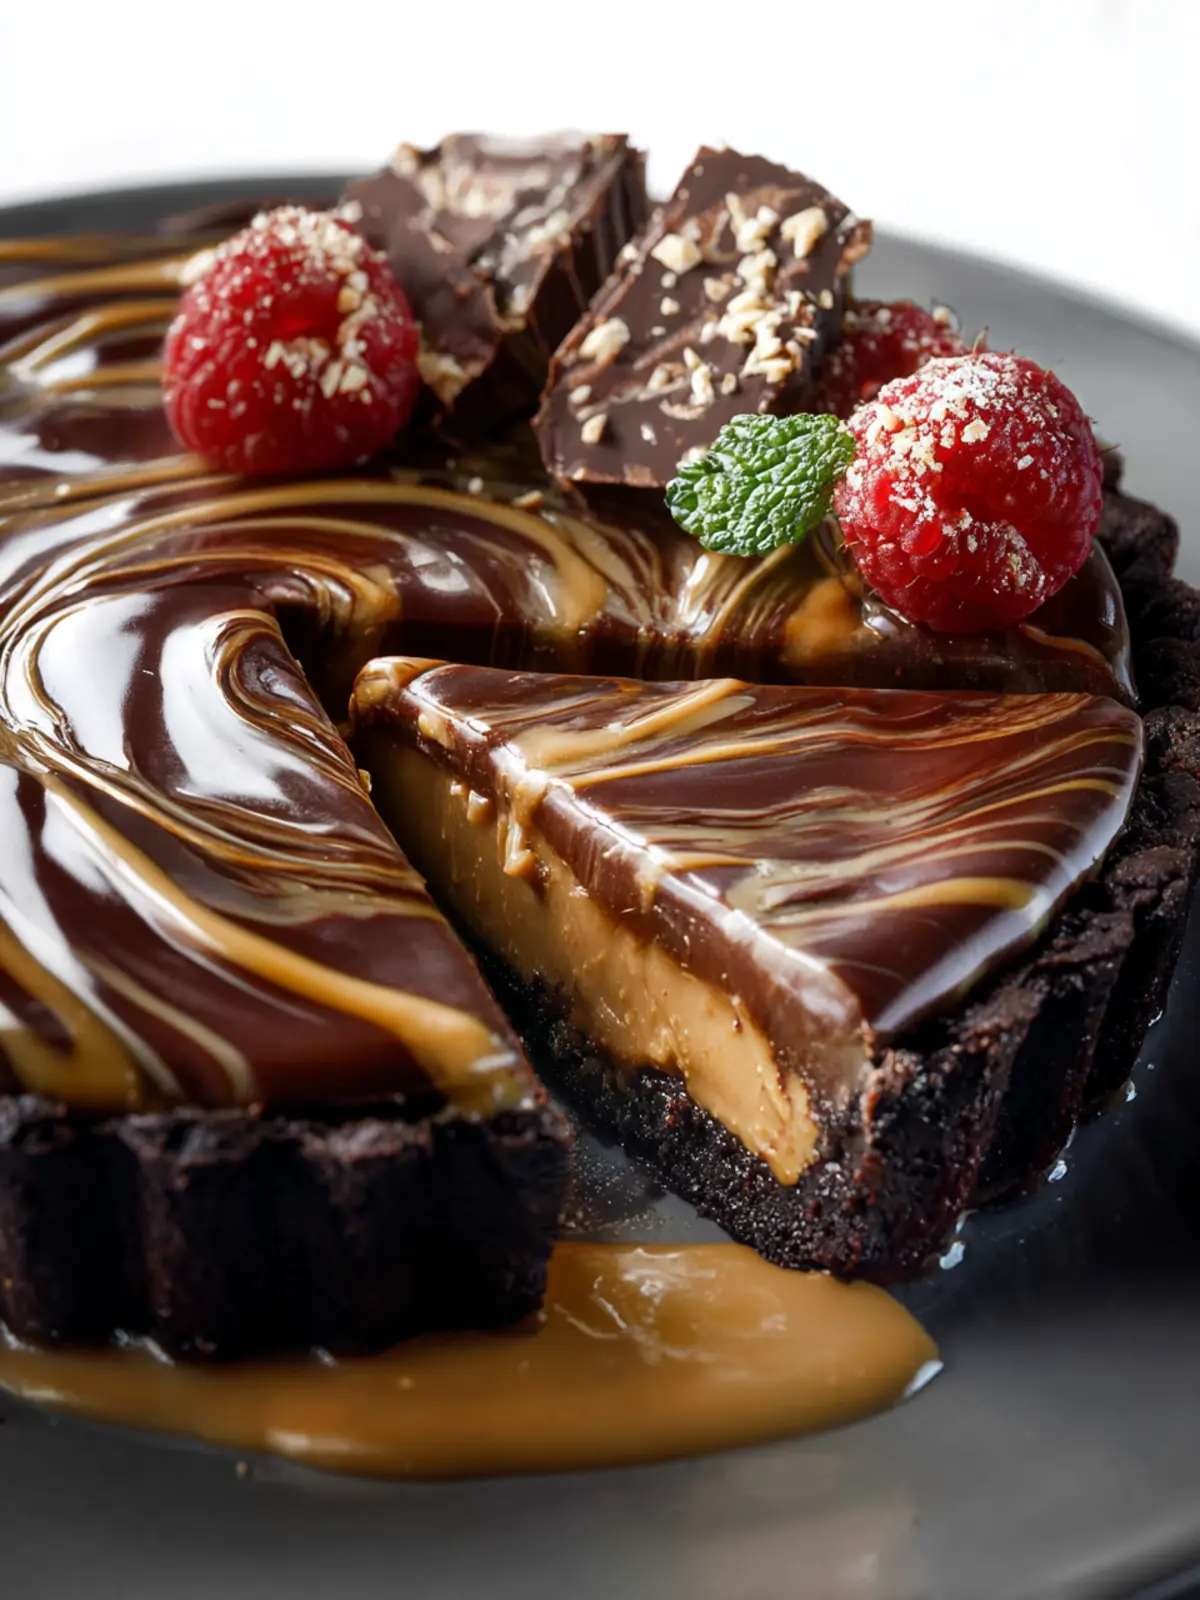
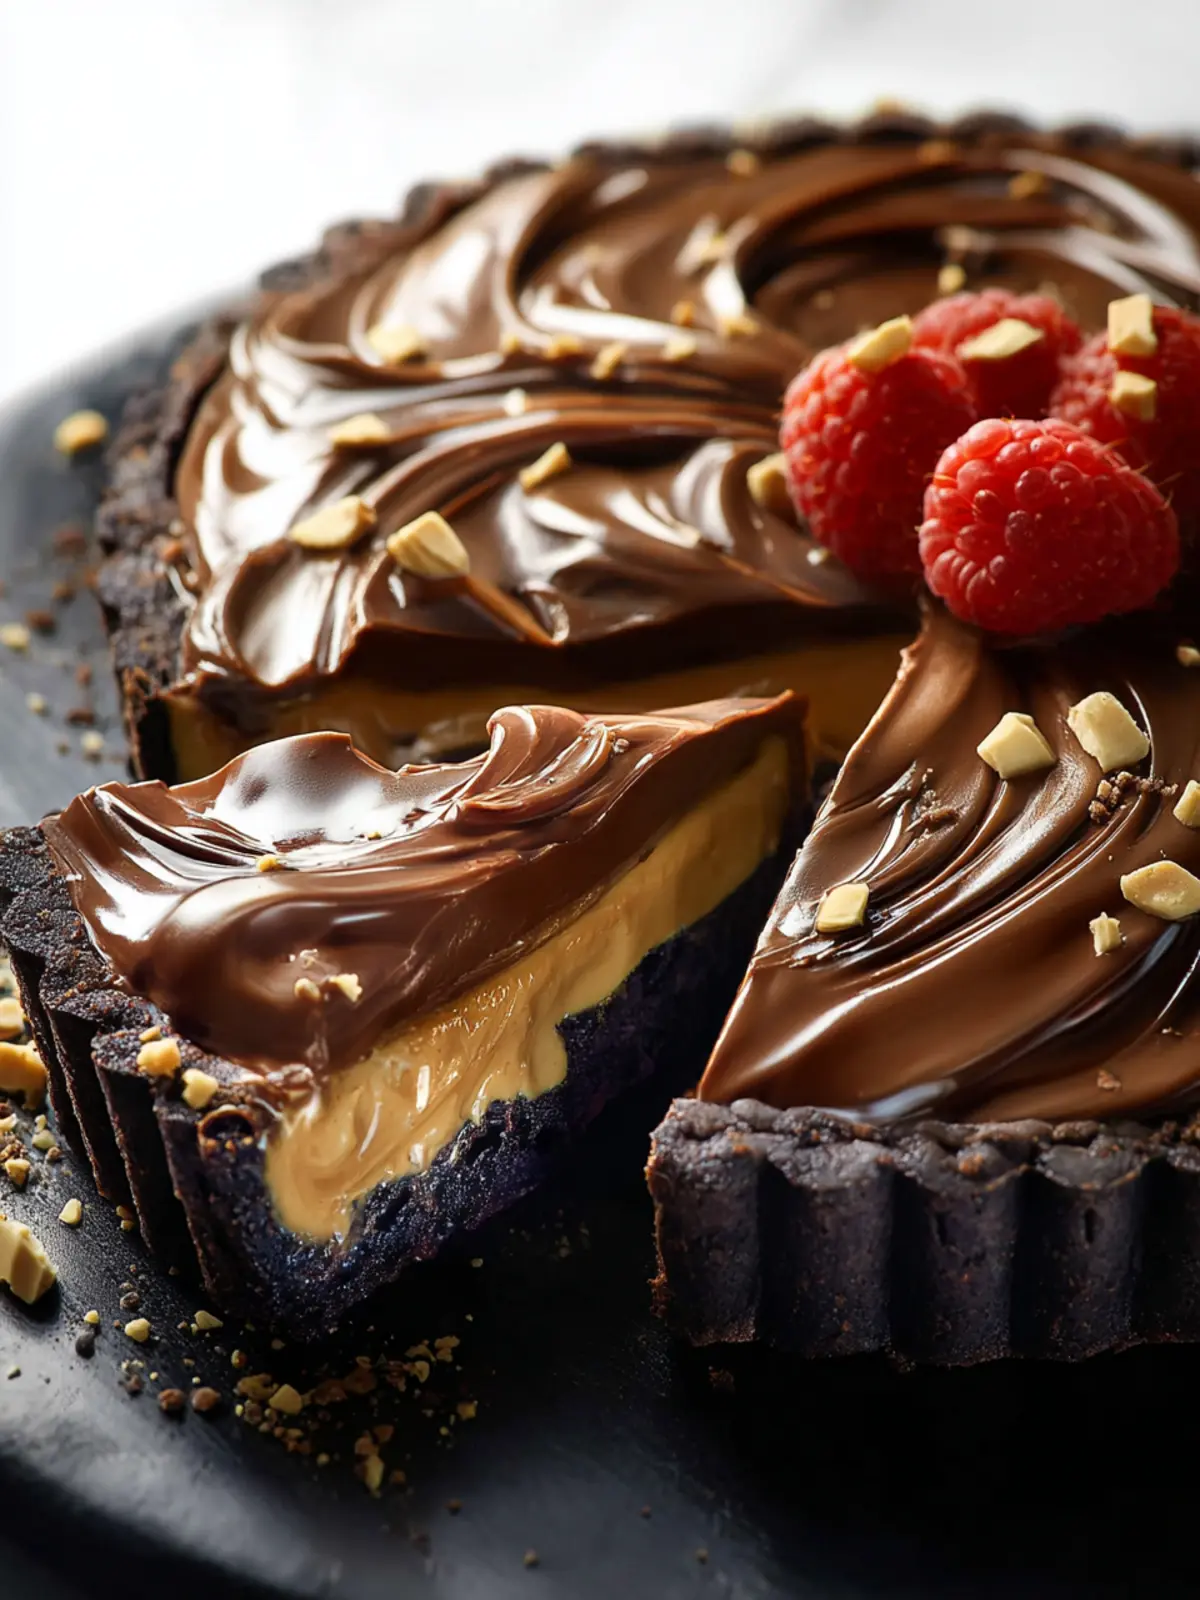
Decadent Layers: The silky-smooth chocolate filling contrasts perfectly with the luscious peanut butter layer. Each forkful is a delightful experience that’s both rich and satisfying.
-
Easy to Make: You don’t have to be a pastry chef to pull this off. With a simple crust and straightforward filling, you’ll find it both approachable and rewarding.
-
Crowd-Pleaser: Serving this tart at your next gathering will earn you endless compliments. It’s a well-loved flavor combo that appeals to both chocolate enthusiasts and peanut butter fans alike.
-
Versatile: Whether you serve it chilled or at room temperature, this tart adapts beautifully to your occasion. Pair it with a scoop of vanilla ice cream, and you’ve got a showstopper that looks as good as it tastes.
Get ready to impress and satisfy cravings with this chocolate peanut butter tart!
Tips for Making the Perfect Chocolate Peanut Butter Tart
Creating an impeccable chocolate peanut butter tart is truly an enjoyable adventure in the kitchen. This dessert combines rich flavors with a satisfying texture, perfect for impressing friends or relaxing at home. Here are some friendly tips to ensure your tart turns out beautifully every time.
Choose Quality Ingredients
Using high-quality ingredients can significantly elevate your tart. Opt for dark chocolate with at least 70% cocoa. This not only adds depth but also balances the creaminess of the peanut butter. Similarly, select a natural peanut butter without added sugars or oils to achieve a more authentic flavor.
Get the Right Texture
For a perfect tart texture, ensure that your butter is softened but not melted. This allows for better incorporation, giving your crust a flaky and tender bite. When mixing your filling, avoid overmixing, as this can lead to a grainy texture.
Chill Your Tart
After baking, let your chocolate peanut butter tart cool to room temperature, then refrigerate it for at least a couple of hours. This chilling period helps the filling set properly and enhances the flavors, making each slice even more delightful.
Presentation Matters
When it’s time to serve, consider garnishing your tart with crushed peanuts or a drizzle of melted chocolate. A little sprinkle of sea salt on top can also heighten the flavors, creating an eye-catching and tantalizing treat.
Follow these tips, and you’ll be well on your way to crafting a stunning chocolate peanut butter tart that delights the senses!
Time Details for Chocolate Peanut Butter Tart
Creating a delectable chocolate peanut butter tart is an investment in both time and passion. Knowing how long each step takes can set you up for success and satisfaction.
Preparation time
This delicious tart begins with a short prep time of about 20 minutes. You’ll be whipping up the crust and filling before you know it!
Baking time
The baking phase lasts approximately 30 minutes. You’ll want to keep an eye on the oven, ensuring it turns a beautiful golden brown.
Setting time
Allow your tart to set in the fridge for about 2 hours after it’s baked. This crucial step helps the flavors meld together while achieving that perfect slice.
Total time
In total, you’re looking at around 2 hours and 50 minutes from start to finish. Trust me, every minute spent will be worth it when you take that first bite of your homemade chocolate peanut butter tart.
Nutritional Information for Chocolate Peanut Butter Tart
When you indulge in a chocolate peanut butter tart, it feels like a guilty pleasure wrapped in every forkful. But how does that decadent delight stack up nutritionally? Let’s explore the details!
Calories
This delightful tart comes in at approximately 350 calories per serving. It’s important to savor each bite, as the balance of rich chocolate and creamy peanut butter creates a truly satisfying treat.
Protein
Packing about 8 grams of protein per slice, the chocolate peanut butter tart not only satisfies sweet cravings but also gives your body a little protein boost. This makes it a kind option for those busy afternoons when you need a sweet pick-me-up without the guilt.
Sugar
With around 20 grams of sugar, this tart strikes a sweet balance. While it’s a treat best enjoyed in moderation, the key is to relish the experience and enjoy every moment spent with this delicious dessert.
FAQs about Chocolate Peanut Butter Tart
Creating a chocolate peanut butter tart is an adventure in itself, and it’s only natural to have a few questions along the way. Here are some of the most frequently asked questions to help you whip up this delicious dessert with confidence.
How can I ensure my tart crust is flaky?
The secret to a flaky tart crust lies in a few key practices. First, use cold ingredients—cold butter and ice water are your best friends here. This helps create steam during baking, resulting in that sought-after flakiness. When mixing the dough, be careful not to overwork it; a gentle touch preserves those lovely, flaky layers. Lastly, refrigerate the dough for at least 30 minutes before rolling it out. This not only relaxes the gluten but also makes it easier to handle.
What’s the best way to store leftovers?
If you find yourself with leftover chocolate peanut butter tart (which might be unlikely!), store it in an airtight container in the refrigerator. This will keep the tart fresh for about 3 days. Just make sure to slice it first, as whole tarts can dry out unevenly in the fridge.
Can I make this tart ahead of time?
Absolutely! Making your chocolate peanut butter tart a day in advance is a great idea. It actually allows the flavors to meld beautifully. Prepare the tart and let it cool completely before covering it with plastic wrap and refrigerating. That way, when you’re ready to serve it, you’ll have a rich and decadent dessert that tastes even better!
Feel free to dive into your chocolate peanut butter tart adventure with these tips in mind. Happy baking!
Conclusion on Chocolate Peanut Butter Tart
Bringing the delightful chocolate peanut butter tart to your table is more than just a recipe; it’s a celebration of flavors that can turn an ordinary day into something special. Whether it’s for a birthday, a cozy movie night, or simply a treat for yourself, this tart captures rich, creamy chocolate paired with the irresistible taste of peanut butter. The crust, with its buttery crunch, perfectly complements the smooth filling, creating a dessert that’s hard to resist. So, the next time you need a deliciously decadent dessert, consider whipping up this fabulous chocolate peanut butter tart that’s sure to impress friends and family alike.
Print
Chocolate Peanut Butter Tart
- Total Time: 3 hours
- Yield: 8 servings 1x
- Diet: Vegetarian
Description
A delicious chocolate peanut butter tart with a rich cream cheese filling and a glossy chocolate glaze.
Ingredients
Scale
- ½ cup powdered sugar
- 1 teaspoon vanilla extract
- 2 egg yolks (whisked lightly with a fork)
- ¼ teaspoon salt
- 1 cup butter (melted and cooled)
- 1 ½ cups all-purpose flour
- 1 tablespoon espresso powder
- ½ cup unsweetened cocoa powder
- 1 tablespoon cornstarch
- 1 cup heavy cream
- 1 cup granulated sugar (divided)
- 2 teaspoons vanilla extract
- 12 ounces cream cheese (softened)
- 1 cup creamy peanut butter
- ⅔ cup heavy cream
- 10 ounces semi-sweet chocolate (chopped)
- 4 tablespoons light corn syrup
- 2 tablespoons water (hot)
- 2 tablespoons creamy peanut butter
Instructions
- Preheat the oven to 350°F.
- In a medium-size bowl, mix with a spatula or wooden spoon, the powdered sugar, vanilla, egg yolks, and salt. Add the butter and mix to a smooth consistency. Add the flour, cocoa, and cornstarch and stir until the dough forms a smooth ball.
- Transfer the dough to an 11-inch tart pan with a removable bottom. With your fingers and a tablespoon, press the dough evenly across the bottom and up the sides of the pan. Prick the crust, bottom, and sides, with a fork; set the tart pan on a baking tray and transfer to the freezer for 30 minutes.
- Remove the baking sheet with the crust from the freezer, spray a piece of aluminum foil with non-stick spray and press the sprayed side of the foil tightly against the bottom and up the sides of the crust. Add pie weights and transfer to the middle rack of the oven.
- Bake for 15 minutes. Carefully remove the foil and pie weights. Continue to bake uncovered for another 15 minutes. Remove from the oven and allow to cool on a wire rack before filling.
- In a medium mixing bowl, whip the cream, ¼ cup sugar, and vanilla until firm peaks form; set aside. In a large mixing bowl, beat the cream cheese and peanut butter until light and fluffy. Add the remaining ¾ cup sugar and beat until smooth and creamy. Fold the reserved whipped cream mixture into the peanut butter mixture and spoon it evenly into the cooled crust and smooth the top.
- In a small saucepan over medium heat, add the cream and corn syrup, then bring to a simmer, stirring to combine. Remove from the heat and add the chocolate, cover, and let stand for 5 minutes to soften. Stir the mixture until it is smooth, then stir in the hot water until the glaze is shiny and pourable.
- Pour the glaze on the center of the tart, quickly and carefully pick up the tart and tilt it from side to side allowing the glaze to flow to the edge. Continue tilting until the surface of the tart is completely covered. Do not use a spatula to spread the glaze as it will mar the surface.
- In a small dish, add the peanut butter and zap in the microwave for 5-10 seconds until melted.
- Spoon and drizzle the melted peanut butter on top of the filling and with a knife-tip create swirls on the surface by dragging the knife-tip through and around in the chocolate.
- Refrigerate for 2-4 hours to set. Let it sit for 10 minutes at room temperature before cutting.
Notes
- Ensure to let the tart cool completely before adding the filling to prevent melting.
- Use high-quality chocolate for the best glaze finish.
- Prep Time: 30 minutes
- Cook Time: 30 minutes
- Category: Dessert
- Method: Baking
- Cuisine: American
Nutrition
- Serving Size: 1 slice